How to Install a WordPress Theme Using cPanel Introduction: WordPress offers a plethora of themes to customize the look and feel of your website. Installing a new theme can breathe fresh life into your site and enhance its visual appeal. While WordPress provides a user-friendly interface for theme installation, you can also install themes manually using cPanel. In this guide, we’ll walk you through the step-by-step process of installing a WordPress theme using cPanel.
Step 1: Access Your cPanel Log in to your web hosting account and navigate to the cPanel dashboard. This is usually accessible through your hosting provider’s website by entering your login credentials.
Step 2: Navigate to File Manager Once you’re logged in to cPanel, locate the “File Manager” icon or option. Click on it to open the File Manager tool, which allows you to manage files and directories on your web server.
Step 3: Locate Your WordPress Installation Directory In the File Manager, navigate to the directory where your WordPress website is installed. This is typically the “public_html” directory, especially if WordPress is installed in the root directory of your domain.
Step 4: Access the “wp-content” Folder Within the WordPress installation directory, locate and open the “wp-content” folder. This folder contains various WordPress files and subfolders, including themes, plugins, and uploads.
Step 5: Open the “themes” Folder Inside the “wp-content” folder, find and open the “themes” folder. This is where WordPress themes are stored.
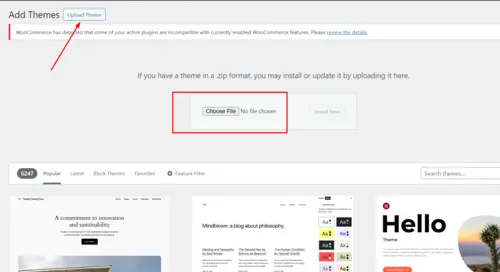
Step 6: Upload Your Theme Click on the “Upload” button in the File Manager toolbar and select the theme ZIP file from your computer. Once uploaded, select the ZIP file and click the “Extract” button to extract its contents into a new folder within the “themes” directory.
Step 7: Verify Installation After extraction, you should see a new folder containing the theme files in the “themes” directory. Close the File Manager and proceed to your WordPress dashboard.
Step 8: Activate the Theme Log in to your WordPress dashboard and navigate to “Appearance” > “Themes.” You should see the newly installed theme listed among the available themes. Hover over the theme thumbnail and click the “Activate” button to activate the theme on your website.
Conclusion: Installing a WordPress theme via cPanel provides an alternative method for users who prefer managing files directly on the server. By following these simple steps, you can easily install a new theme and customize the appearance of your WordPress website. Experiment with different themes to find the perfect look for your site and enhance its overall design and functionality.